
When creating stencils with Ikonart, fine-tuning your print settings is crucial for achieving the best results. While these settings may vary depending on your printer model, the general principle is to aim for the highest possible print density. This involves adjusting your print settings to print as dark as possible.
In this blog post, we’ll walk you through how we adjust our print settings for optimal stencil-making using the Canon Pixma 6820 and the Vectr online editing program.
WATCH VIDEO: Adjust Print Settings for Canon Pixma in Vectr
WATCH VIDEO: Adjust Print Settings for Canon Pixma in Adobe Illustrator
Step-By-Step Guide To Adjust Your Print Settings When Making Ikonart Stencils
Adjusting your print settings ensures that your stencils wash out easily and produce clean, precise designs. The key is to make your printer print slowly, laying down as much ink as possible. A darker print helps during the washout process, ensuring that your stencils maintain sharp edges and clear details. If you're not sure if your artwork is dark enough, try this tip.
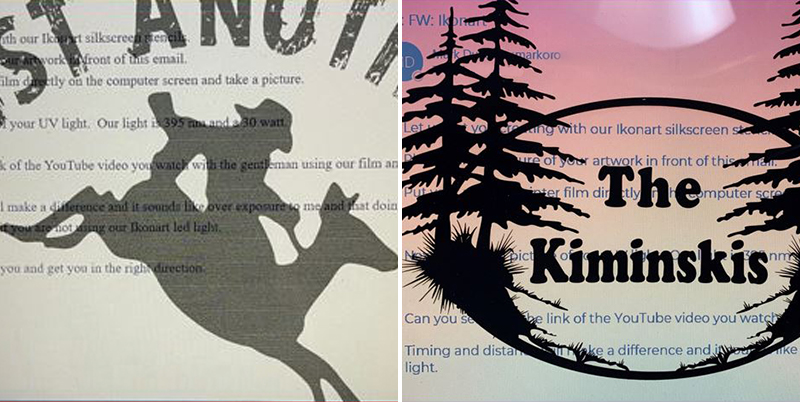
One good way to tell if your printed artwork is dark enough is to hold it up to your computer screen or a light source. If you can see through your artwork (like the photo above on the left) then your artwork is not dark enough. This will let light through during exposure and make washout take a really long time. You want your artwork to look like the photo above on the right. When you hold it up to a light source, you shouldn't be able to see through the ink.
Here is how we adjust our print settings for our Canon Pixma iX6820.

1. Prepare Your Artwork
Before adjusting your print settings, make sure your artwork is ready in Vectr, a free online editing program that's user-friendly for beginners. If you’re new to Vectr, checkout our Artwork For Beginners playlist.
Start by ensuring your design is set to 100% black. Here’s how:
- Select your artwork.
- Navigate to the "Fill" options and set it to 100% black.
- If your color palette doesn’t automatically appear, right-click and choose "Ungroup" to bring up your options.
2. Optional: Mirror Your Artwork
Some users prefer to mirror their artwork before printing, depending on their specific project needs. To do this in Vectr:
- Group your artwork.
- Click on "Flip Horizontal" in the task bar at the to top of your artwork to mirror the design.
3. Adjust Print Settings
When you’re ready to print, follow these steps:
- Select "Export" in Vectr and choose "Print."
- Ensure your document size matches your stencil film size (typically 8.5” x 11”).
- To avoid low-quality prints with lines or grayscale effects, click on "More Settings."
- Scroll down and select "Print Using System Dialog Box" to bring up advanced settings.
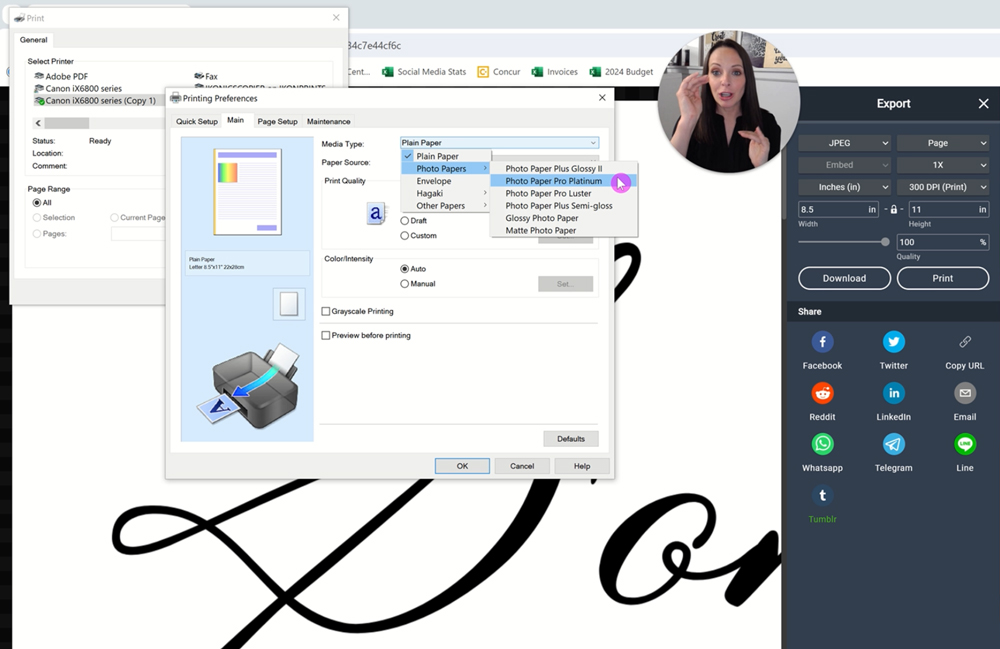

4. Customize Your Canon Pixma Settings
Once your preferences box opens, adjust the following settings:
- Paper Setting: Choose "Photo Paper Pro Platinum." This setting allows you to select the highest print quality available.
- Print Quality: Under "Custom" settings, set the print quality to the highest level (move the slider to 1).
- Grayscale: Select "Grayscale" to ensure deep, rich blacks.
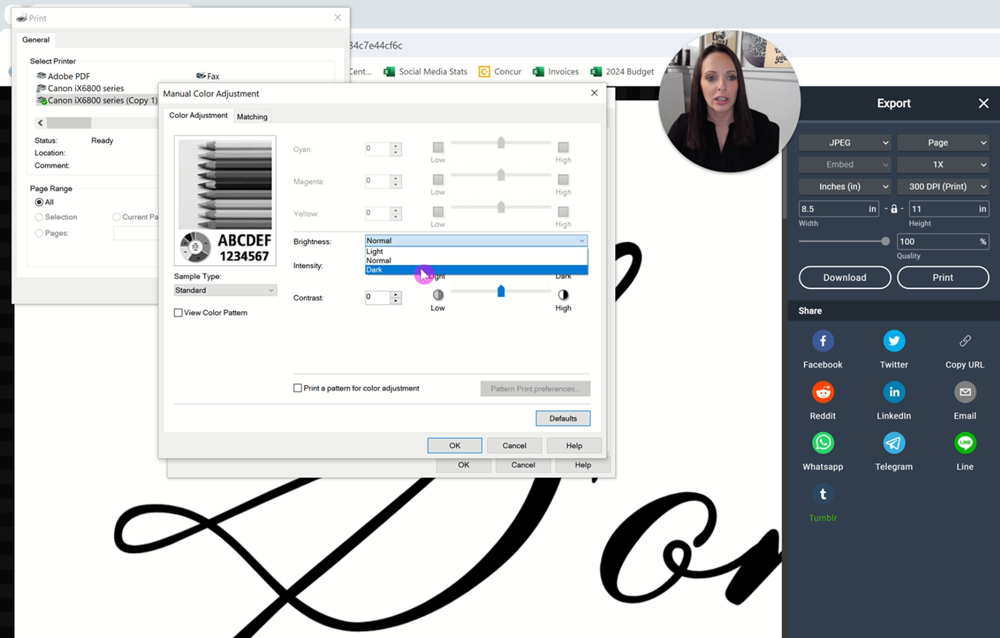
- Color and Intensity: Manually adjust the following:
- Brightness: Set to "Dark."
- Intensity: Move the slider to the right for maximum darkness.
- Contrast: Increase to the highest level.
These adjustments enhance the contrast between light and dark areas, resulting in sharper, more defined stencil designs.
5. Save Your Settings
After making these adjustments, save your settings for future use:
- Go to the "Quick Setup" tab.
- Click "Save" and label your settings as "Ikonart."
- The next time you print, simply select your saved Ikonart settings for quick and easy printing.
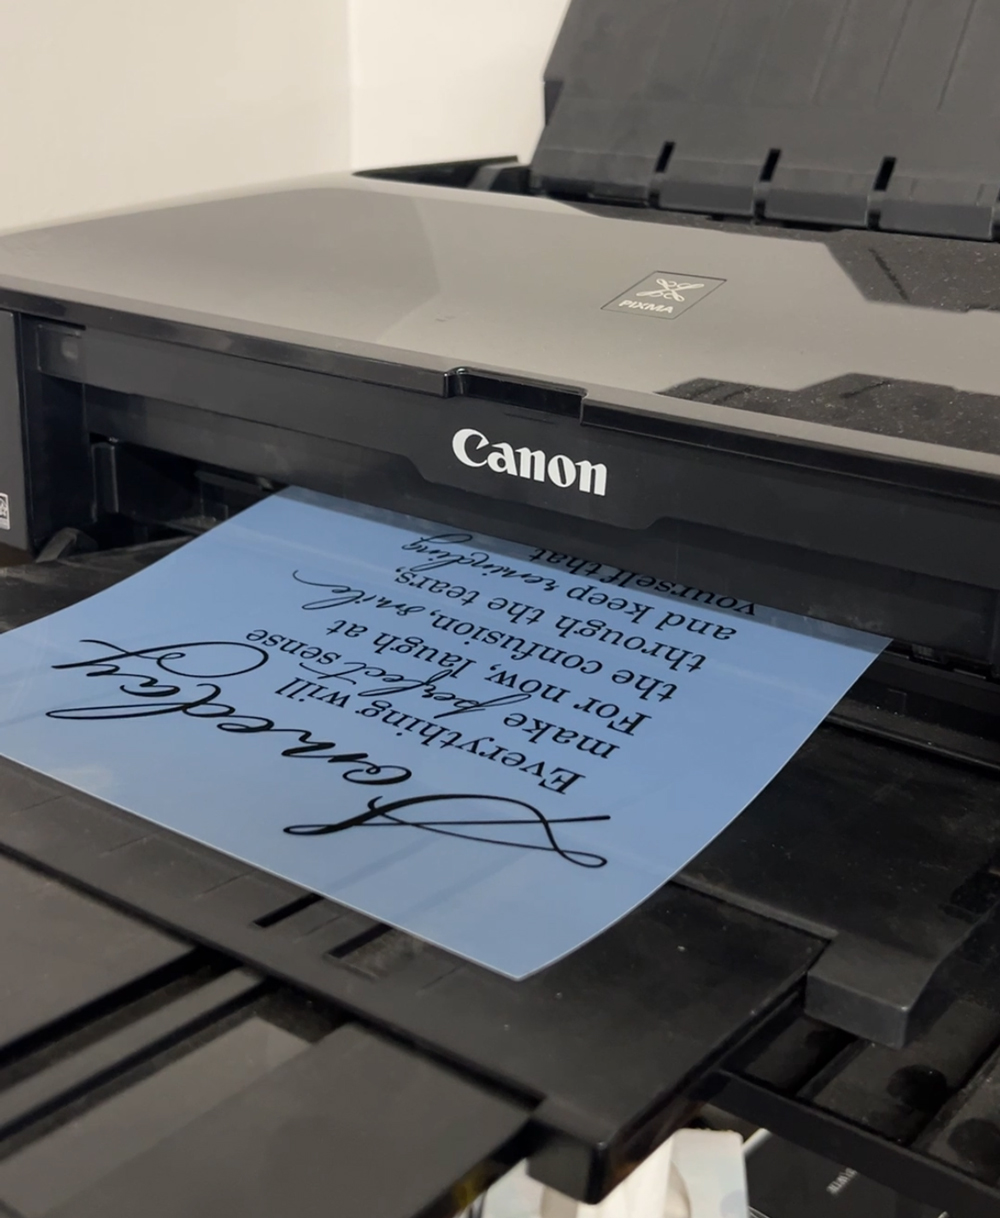
6. Print Your Design
Click print. After printing, hold your artwork up to a light or put it in front of a window. Your shouldn't be able to see through the artwork. That is how you know if it printed dark enough.
Why Ink Type Matters When Printing Artwork for Ikonart
The quality of your ink can significantly impact your stencil results. Not all inks are created equal, and using low-quality, off-brand ink can lead to lighter prints. We generally recommend using the ink that was formulated to work with your printer. However, we have tested Arthur Imaging inks for density and quality and have found that they perform as well, if not better, than Canon’s own inks for the Canon Pixma iX6820.
For additional tips on printing artwork for Ikonart stencils, check out our blog post, 5 Tips for Printing Artwork for Ikonart Stencils.
By carefully adjusting your print settings, you can ensure your Ikonart stencils are dark, detailed, and easy to wash out. This guide is part of our Ikonart 101 Series, where we break down each step of the stencil-making process. If you have any additional questions about how to make Ikonart stencils, please contact the Ikonart team or reach out to us in the Ikonart Crafters Group on Facebook.