If you want to make your own custom pottery pieces but you don't have a kiln, this is a great hack from Malaine Colver. Malaine purchases blank bisque pieces from her local pottery shop, brings them home to paint them, then takes them back to the pottery shop where they fire and glaze them for her. It's the perfect way to create food-safe ceramic pieces at home without needing to be a potter or own a kiln.
Malaine is the owner of Hope & Dimples, an online art studio teaching various painting techniques on bisque ceramics. She uses her Ikonart Custom Stencil Kit to turn her hand drawings and hand letterings into reusable stencils so she can create one-of-a-kind ceramics. Keep reading to see exactly how she does it.
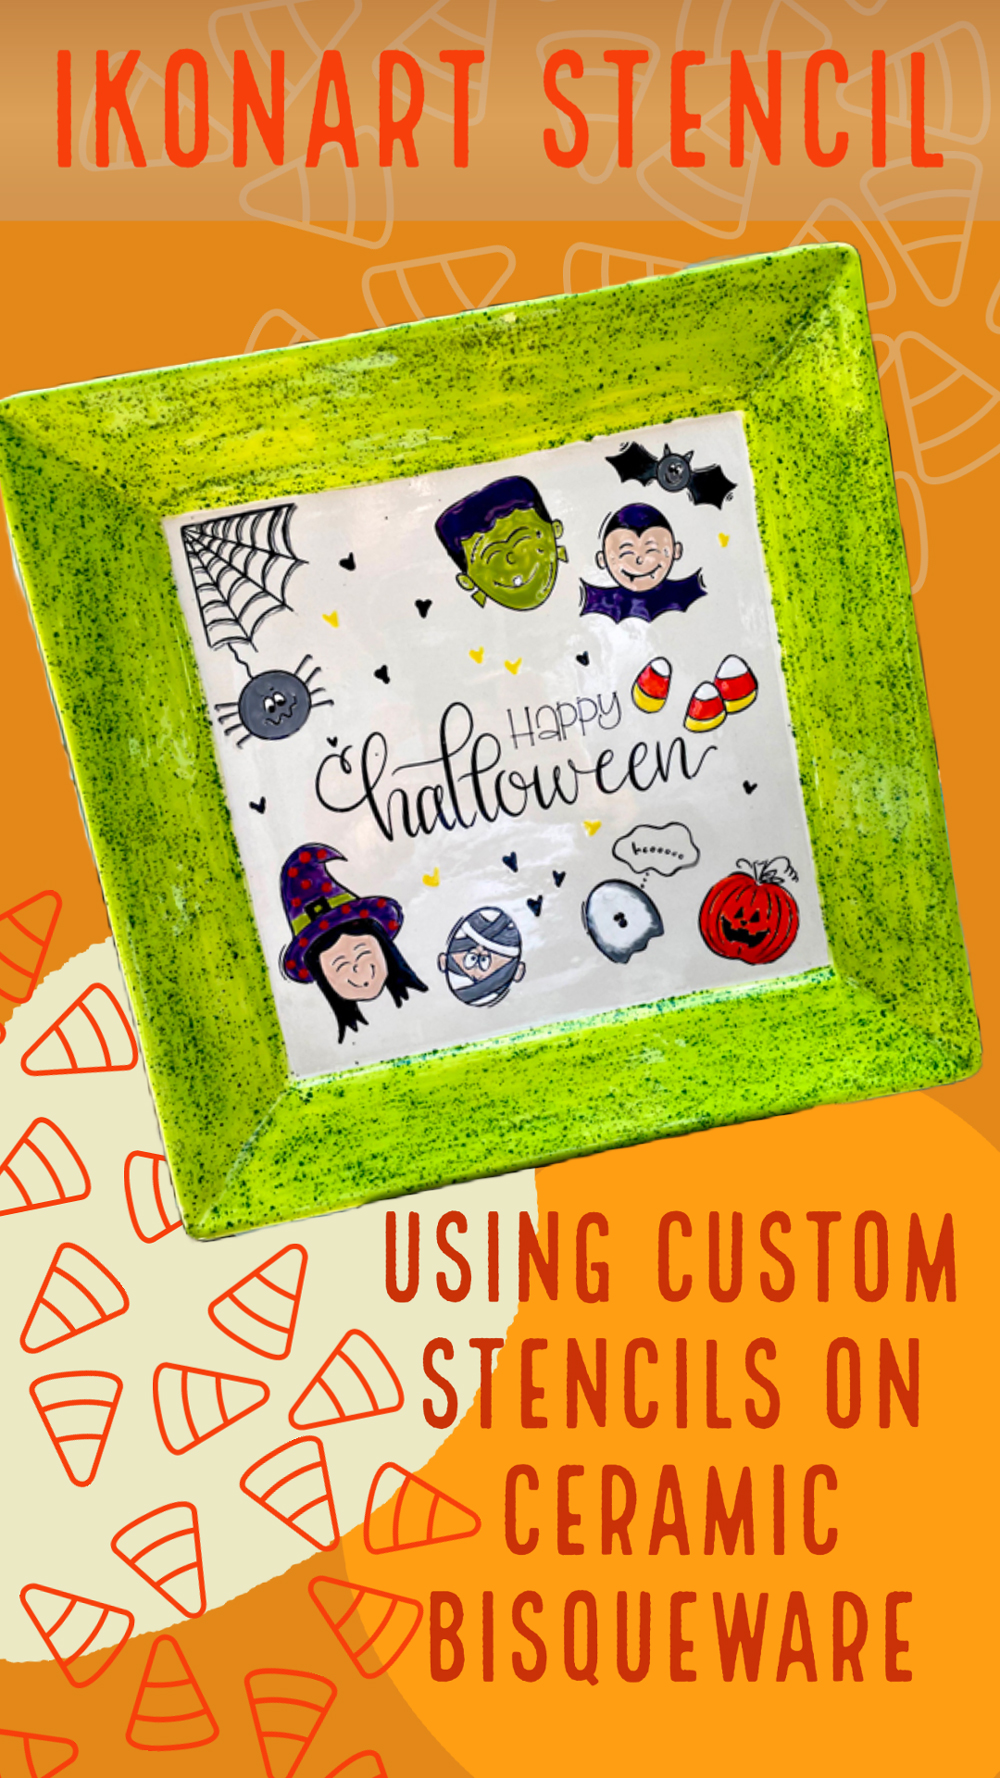
How To Stencil a Ceramic Halloween Platter with Ikonart
Hi! My name is Malaine and I am a lettering artist, illustrator and bisque ceramics artist/instructor. Today I want to show you how I used my custom Ikonart stencils to create this Halloween Friends Party Platter shown in the video below.
This started out as a bisque, unpainted ceramic platter that I picked up at my local paint-your-own-pottery shop. I used a large square platter, but because I used individual stencils you can use small plates or even mugs with this same design. Just have fun with it!
Supply List
For supplies, you will need the following:
- Ikonart Custom Stencil Kit
- Halloween Friends digital download (or artwork of choice)
- Large blank bisque ceramic plate or serving platter (from local pottery shop)
- Large Flat Brush (for border)
- Small Round Detail Brush
- Precision Tip Applicator Bottles (optional)
- Water
- Paper Towels
- Painters Tape
- Mayco Stroke and Coat Colored Glazes in colors of choice (for this tutorial I used SC15 Tuxedo Black, SC16 Cotton Tail, SC6 Sunkissed, SC13 Grape, SC27 Sour Apple, SC35 Gray Hair, SC46 Rawhide, SC75 Orange a Peel, and SC227 Speckled Sour Apple)
What Is Bisque Ceramic?
In the ceramic world, bisque means that the clay piece has been fired at a high enough temperature in order for it to harden. Once it has been fired, the clay turns from gray to white and that’s when it is ready to paint. Bisque pieces can be painted using glazes, underglazes, or with acrylic paints. Then a sealer is either brushed on or sprayed on.
But, use caution! When painting pieces that will come into contact with food or beverages, food-safe glazes that require an additional firing MUST be used in order for the dishware to be food and dishwasher safe. Acrylic paint can be toxic if ingested, and therefore should never be used when creating food and beverage pieces.
Food-safe glazes are a thick suspension of minerals that are applied to the surface of bisque-fired ceramics by brushing, pouring, or dipping. After the glaze dries, the piece is fired in a kiln to the temperature at which the glaze ingredients will bind together to form a high gloss colored surface.
Glazing bisque ceramics is a great way to create fun, one-of-a-kind holiday dishware and who doesn’t love a fun party platter!
How To Add Custom Designs To Bisque Ceramic
Once your piece is fired you are ready to paint. Watch the video below for a quick overview of how I add my designs and colors to my raw bisque plate, then keep scrolling to read the step-by-step instructions.
Step 1: Prepare your dishware. Before glazing, wipe dishware lightly with a damp sponge. Dust can accumulate in the crevices after the first firing and you don’t want that dust getting into the paint. You can also use a large paintbrush to lightly brush all of the dust particles off before painting.
Step 2: Make your stencils. Print your artwork and use the Ikonart Custom Stencil Kit to turn your custom artwork into a reusable stencil. I am using the Halloween Friends digital set for this project. Once the stencils are ready to use, simply cut each one out and lay them around the plate where you’d like the pieces to remain permanently.
>> Watch Video: How To Make An Ikonart Stencil
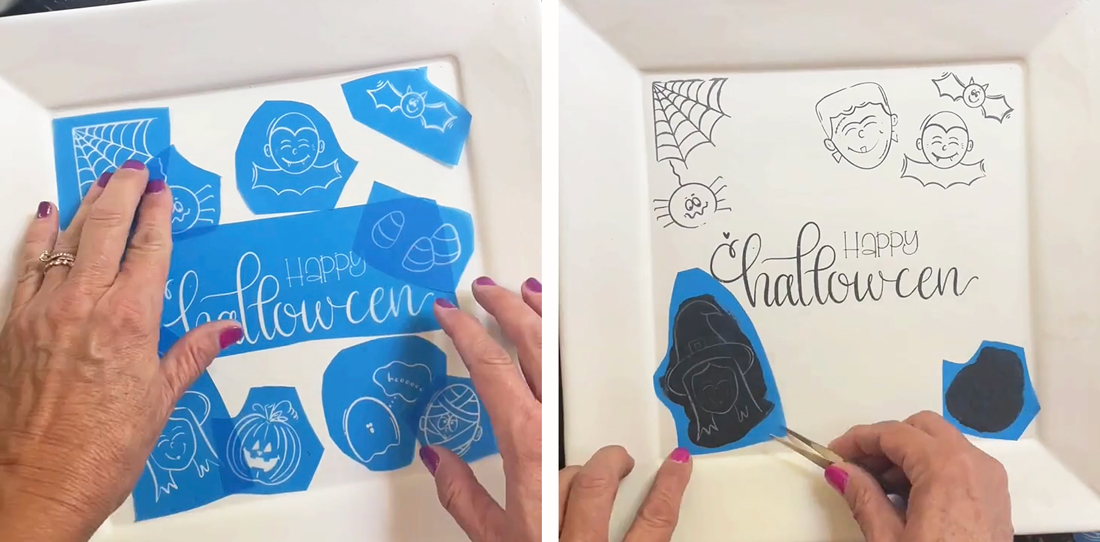
Step 3: Apply your stencils. Remove the clear backing from the stencils, then reposition them back into the designated place on the plate (pictured above, left). If you are worried about paint seeping under your stencils or getting paint outside the edges of your stencil you can tape down all sides of the stencil to the plate using painters tape, ensuring that all sides are completely flat on the plate.
Step 4: Add your black outline. Use the large flat brush to brush 1-2 coats of Tuxedo Black over each image (pictured above, right). You can paint each one individually or paint them all at the same time. Because Stroke and Coat paints are very thick a regular paint brush works fine for applying it to the stencils.
Step 5: Remove stencils. After drying for a few minutes, gently remove the tape from the screen (if using) and remove each screen from the plate. Rinse the screens with warm water and immediately reapply the clear backing. Any mistakes or bleed through can be wiped away with a sponge or small paintbrush and clean water, just make sure you completely remove all remnants of the black paint.
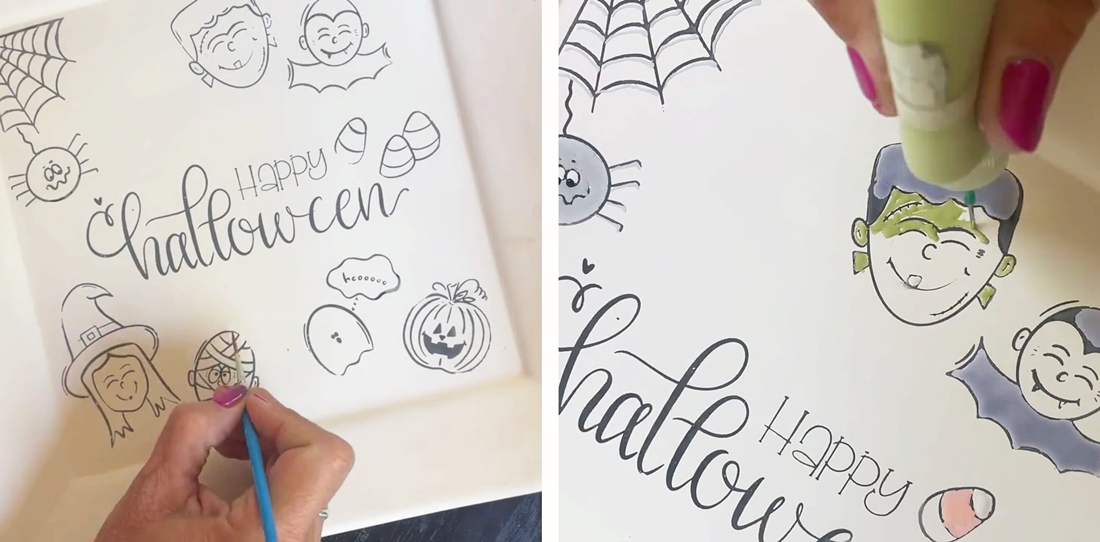
Step 6: Hand paint your colors. After removing the stencils, now we are ready for the FUN part...PAINTING! If needed you can use the small paint brush to touch up any of the black outline (pictured above, left). Then color each character with the colors of your choice. If using a paintbrush you will need 2-3 coats of each color. The glazes are like watercolor paints in the sense that if you only paint 1-2 coats the color may appear transparent after firing. You can also use precision tip applicator bottles to apply the paint, which is what I used for this project (pictured above, right). Try to avoid painting over the black lines though because you want those to show up after firing.
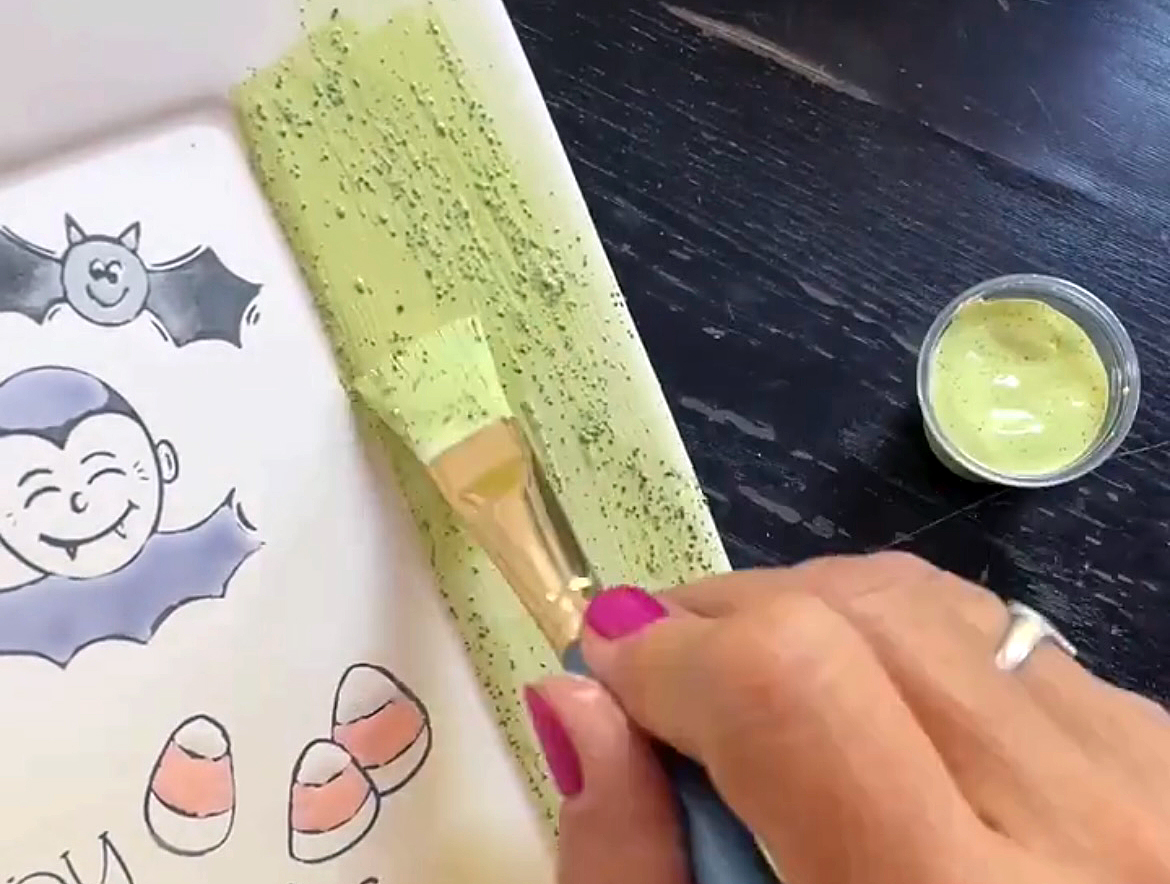
Step 7. Add border to platter. Use a large flat brush and SPC227 Speckled Sour Apple to paint three coats of color around the trim and the back of the platter (pictured above).
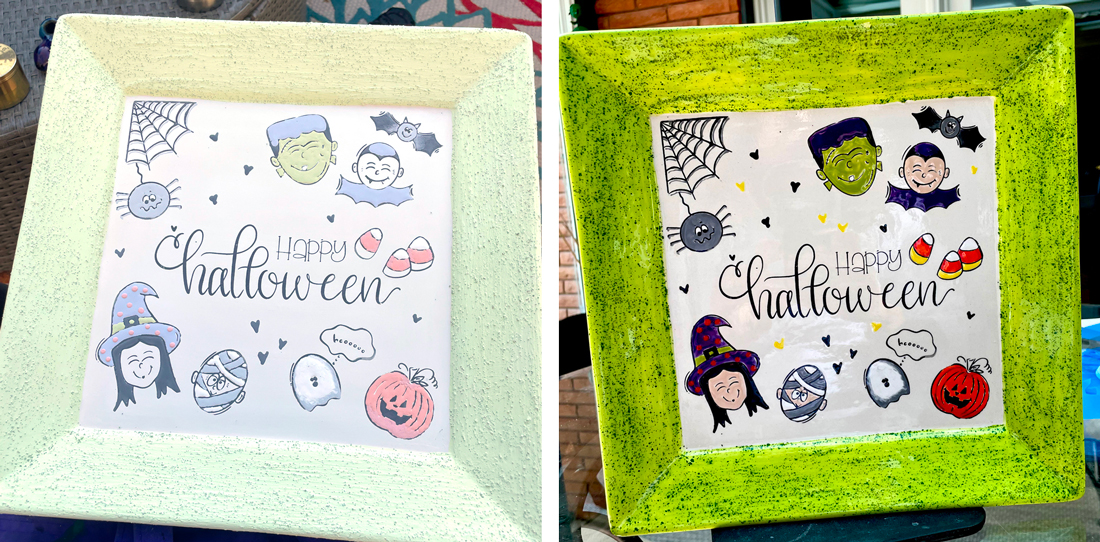
Step 8: Add food safe glaze. Let the platter dry (pictured above, left) then return it to the pottery shop to be dipped into a clear high gloss, food-safe glaze. Then it’s ready to be fired at cone 06 in the kiln. After it comes out of the kiln the colors will brighten significantly and the plate will be nice and glossy (pictured above, right).
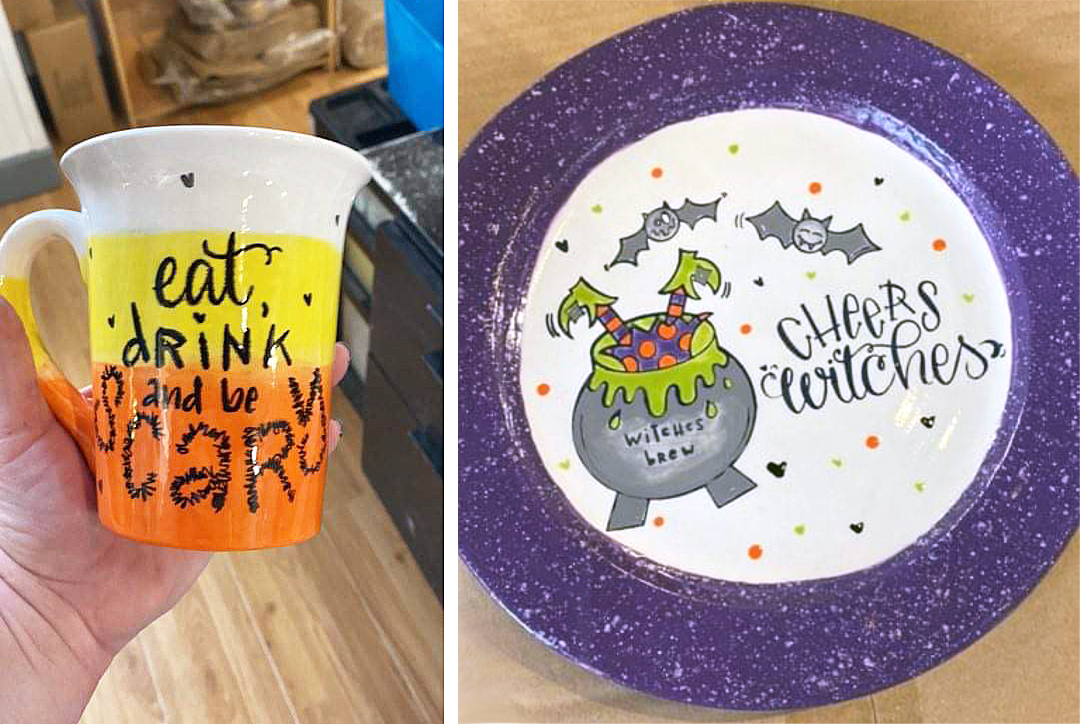
And that’s it! It usually takes 48-72 hours to get your completed project back from the shop, so try to be patient. :) Part of the excitement of painting with glazes is anticipating the outcome but not actually knowing how it will turn out until it’s "cooked," or out of the kiln. I made this Eat Drink and be Scary mug (pictured below, left) and this Cheers Witches plate (pictured below, right) the same way. There are so many possibilities with Ikonart!
Live Demo for Painting Raw Bisque Ceramic
Join me on Wednesday, October 19th 6-7:30 PM MST when I will host a free live webinar and show you how to create this fun Halloween platter to serve at your next party. Register for "Painting a Halloween Friends Platter Using Silk Screens & Stroke and Coat Glazes" so you get a notification when the live tutorial starts.
Happy Painting!
Malaine Colver
Hope & Dimples
Website:
Hope & Dimples
Facebook:
Hope & Dimples
Instagram:
@hopeanddimples
YouTube:
Hope & Dimples Studio
TikTok:
@hopeanddimples